Wiper Blade Replacement
Difficulty: Easy
Duration: 5 minutes
How often: Every 6–12 months
Visibility is extremely important to safe driving. If your current wipers are not wiping well or leaving streaks, change them immediately.
Things you’ll need from your garage or your local Southern Auto Parts Store:
- Tape measure
- Small pocket screwdriver
- Needle-nose pliers
- Anti-seize compound
- New wiper blades
- Wiper blades are usually packaged with the rubber wiper as well as its support structure

Step 1
You can take in one of your old blades to the local Southern Store, Some vehicles use different length wiper blades on the driver’s side versus the passenger’s side.
Open the package containing the new windshield wiper blade. The package should include up to three or four different styles of blade attachments that secure the new blade to the wiper arm.
Step 2
Pull the wiper arm up and away from the car.
The blade and arm should now be sticking out perpendicular to the window. Some wiper arms will only come up two or three inches from the windshield. If your wiper arm only comes up a small amount, don’t force it. There should be a locking tab at the base of the wiper that will lock it in the raised position.
Step 3
Match the existing attachment to one of the attachments included with the new wiper blades.
The attachment is where the arm and blade meets. There are several styles of attachments. The three most common are the hook-slot connector, pin-type arm and straight-end connector.
Hook-slot connector: Swing the blade perpendicular to the arm so you can see the connector. You’ll find a tab at the connector that needs to be lifted or pushed to release the lock that holds the blade pivot in the hook slot. Once the tab is released, a firm shove toward the base of the arm will slide the blade right out of the hook slot.
Pin-type arm: Raise the arm and examine the locking tab that holds the blade onto the pin. You’ll either have to push the tab up from underneath the blade or lift the tab from the top with a screwdriver. Once the tab unlocks the pin, pull the blade assembly with a sideways motion away from the arm. The new unit may simply lock onto the pin. Sometimes, the box will contain an adapter that locks into the blade opening and accepts pins in different sizes.
Straight-end connector: The straight-end connector can be tricky. Sometimes you need to lift a tab on top of the existing blade with a screwdriver to clear the locking nub on the arm. You may also need to cock the old blade a few degrees out-of-parallel with the arm to slide it off the arm’s end.
Step 4
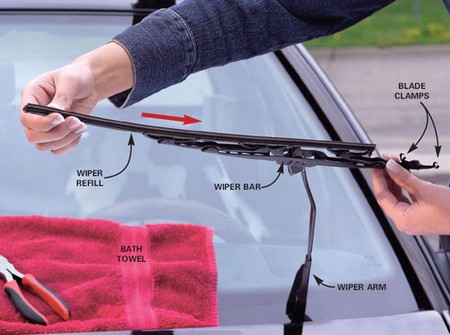
Remove the windshield wiper blade from the arm at the attachment.
There is usually a small tab you can depress with a screwdriver that allows you to pull the blade from the arm. Some attachments have a small metal bump and two tabs on either side; depress the tabs and pull hard to remove the blade. Some just snap onto the blade. Once the old blade is off, you can apply a little anti-seize compound to the arm.
Step 5
Install the correct attachment to the new blades, then install the new blades onto the windshield wiper arm.
Test by turning on the wipers. If the blades slip, turn off the wipers and seat the attachments more firmly.
Important Tips
- It is better to replace the whole wiper blade, not just the rubber part.
- The new wiper blades will come in a package with up to three or four attachments for each blade. One of these is the correct one for your car.
- Changing wiper blades for the first time has been known to cause extreme frustration—contact your local NAPA AutoCare Center if you are having trouble.
- Don’t let the windshield wiper arm snap back against the windshield when there is no blade attached; this can crack the windshield. Lay a clean rag on top of the windshield to protect the glass in case the bare-metal wiper arm suddenly snaps down on the windshield’s glass.
- If your car has wipers that park behind the lip of the hood, turn on the ignition and the wipers and then shut off the ignition when the wipers are mid-stroke so you can access them.
